Category Archives: Support

How to Assign a Dispatch Route to a Vehicle

Assigning a dispatch route to a vehicle in the Milo FMS is easy to do. Please follow the steps below to send a message to the Garmin.

Requirements: Dispatch Center module
Milo Fleet Management System: tracking.EfficientFleets.com
How to Assign a Dispatch Route

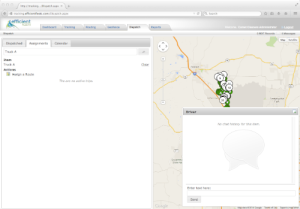
1. Click on the Dispatch tab.

HowToAssignRouteToVehicle

2. Click on the Assignments tab.

HowToAssignRouteToVehicle2

3. Search for the vehicle that you want to assign a route too.

Click on the search button or type in the first few letters of the vehicle name in the text box.

HowToAssignRouteToVehicle3

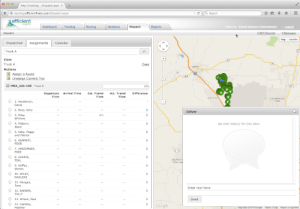
4. Click on the vehicle name that you are looking for.

HowToAssignRouteToVehicle4

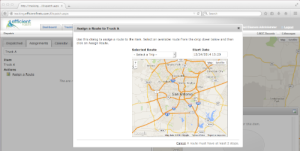
5. Click Assign a Route

HowToAssignRouteToVehicle5

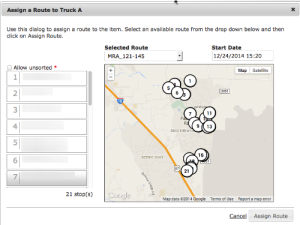
6. Select the route from the Selected Route dropdown menu.

You can schedule a route for a future date. Click on the Start Date text box to choose the date. By default, the route is assigned immediately.

HowToAssignRouteToVehicle6

7. Click on Assign Route.

HowToAssignRouteToVehicle7

The route is now assigned to a vehicle. The route will be transmitted immediately to the Garmin in the vehicle if the start date (step 6) is today’s date. If it is a future date, then the route will be sent on that date.

How to Create a Route in the Milo Dispatch Center

Creating a route in the Milo FMS Dispatch center is easy to do.

Please follow the steps below to create a route. To use the Dispatch center you must have the Dispatch module enabled.

Milo Fleet Management System: tracking.EfficientFleets.com

How to Create a Dispatch Route

1. Click on the Dispatch tab.

CreateRouteInDispatch

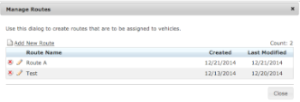
2. Click on the Routes button.

CreateRouteInDispatch 2

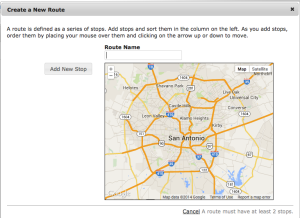
3. Click on Add New Route.

CreateRouteInDispatch3

4. Enter a name for the route.

CreateRouteInDispatch4

5. Click on Add New Stop. Each route must have at least 2 stops.

3 Ways to add a stop:
*Existing POI (landmark)
*Existing Stop
*Address

CreateRouteInDispatch5

6. Click on Specify an Address. Enter the name and address for 1 stop.

CreateRouteInDispatch6

7. Click on the Map to Coordinates button. This places a marker on the map for the stop.

CreateRouteInDispatch7

8. Click Next.

CreateRouteInDispatch8

9. Complete the arrival and departure times for this stop. The information entered does not have to be exact. It designed to help you determine how efficient your fleet is operating.

Estimated Arrival Time to the Stop: select a time that the vehicle is supposed to arrive.

Day (based on estimated arrival): choose when the vehicle is supposed to leave. “On the same day” means the vehicle will be leaving the same day that it arrived. “On the next day” means that the vehicle will depart the day after it arrives.

Stop Buffer (ft): the buffer size to determine if vehicle has arrived at stop. You may need to adjust the buffer size if the vehicle cannot get close enough to the stop.

CreateRouteInDispatch9

10. Click Next.

CreateRouteInDispatch10

11. Click Add New Stop to add the 2nd stop. Follow steps 4 – 10 to create the next stop.

CreateRouteInDispatch11

12. Click the Create Route button to finish the route.

CreateRouteInDispatch12

MILO FLEET MANAGEMENT SYSTEM RELEASE NOTES — RELEASE DATE: NOVEMBER 2014

Enhancement: New Filter to the Reports Date

Benefit to Users:

This New Filter, available on All Reports, provides the User with the ability to base the Date Range of a Report on the ‘Last 24 Hours.’ This Feature will be available for All Current Reports and all New Reports going forward. Prior to this Release, this filter was not available within any of the Reports.

Highlight:

While configuring a Report, within the Available Filters, Users will now have the ability to select a Date Range of the ‘Last 24 Hours.’ By providing this Date Range Filter, Users will be able to continually run a Report on the Last 24 Hours of Reporting. As this is a ‘floating’ date range, My Reports and Report Subscriptions can also take advantage of this Date Range Filter. Users will be able to set this once and continually have the updated, Last 24 Hours of Information available in the Saved Report.

Milo Im 8

Enhancement: Sendum Device Integration Enhancement

Benefit to Users:

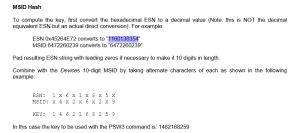
This Enhancement to the Sendum Device Integration includes the calculation of the Sendum Key within the Position Logic Platform. Prior to this Release, the calculation of the Sendum Key was not a calculation that was available within the Position Logic Platform.

Highlight:

This Enhancement will enable Users to quickly & accurately generate the Sendum Key within the Position Logic Platform. Users will simply login and Edit a Sendum Vehicle, on the selected Client. From the Edit Screen, the User will click ‘Save’ and the Sendum key will be generated, based on the following logic:

*Contact your Support Technician if you are currently using Sendum Devices, to ensure this Key is generated for all of your Sendum Devices.*
Milo Im 11

Enhancement: POI Buffer Visibility

Benefit to Users:

This Enhancement to the POI Buffer within the Platform, provides the User with instant visibility into not on the POI Name and Icon but, also the Buffer that is associated with the POI. Users will now very easily be able to identify the core of the POI along with the entire Buffer that is associated with the POI. Prior to this Release, the User had no visibility on the actual POI Buffer while viewing the POI within the Tracking Map.

Highlight:

While viewing the POIs on the Tracking Map, Users will now be shown the actual Buffer of the POI. By simply selecting to ‘show’ the POIs, Users will find that the POI Buffer that has been setup, is now visible as a colored area around the POI. While this is a simple Enhancement, the overall User experience will be greatly increased thanks to this.

Milo Im 12

Bug Fix: User Geofence Import, Missing Tools
Issue:
A number of non-Admin Users with the Security Resource of GEOFENCE_IMPORT, were missing the Import Tools options for ‘Import Geofence from KML’ and ‘Import Geofence from Excel’ within Tools & Settings.

Solution: The Security Resource of GEOFENCE_IMPORT has been corrected to ensure that these two Import Geofence Options are now available within Tools & Settings. Any Users, with the Security Resource enabled, will now be able to see these Import choices. No further updates are needed by any Users experiencing this issue.

Milo Fleet Management System Release Notes — Release Date: October 2014

Milo Fleet Management System Release Notes — Release Date: October 2014
New Report: Queclink GV-500 OBD Report
Benefit to Users:

This New Report provides the Queclink GV-500 OBD Data in an easy to view & use Report Format. This Report will only work with the Queclink GV-500 Device, which provides OBD Data. Prior to this Release, this information was available within the Platform but, not available within any of the Reports.

Highlight:

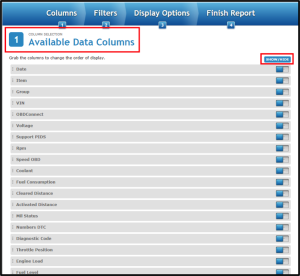
Any Users tracking with the Queclink GV-500 OBD Device, will be able to take advantage of this Graphical Report. Within the formatting of this Report, Users have the ability to select to View a number of Data Columns including VIN, Diagnostic Codes and Fuel Consumption. By providing this Report, Users are now able to truly utilize all OBD Information sent via the Queclink GV-500 Device. In addition, this will enable the Users to Graph a variety of this OBD Data.
Milo Im 7 10-27-14

Milo Im 8 10-27-14

Enhancement: View Battery Level in Monitoring Center
Benefit to Users:

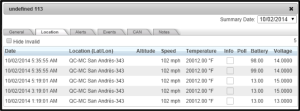
This Enhancement to the Monitoring Center Platform, will enable Users to view the Battery Level reported by Devices. Any Devices reporting Battery Level will display in the Track Page of the Monitoring Center Platform. Prior to this Release, this information was not displayed in the Track Page of the Monitoring Center Platform.

Highlight:

Once logged into the Monitoring Center Platform, and within the Track Page, Users will be able to view the Battery Information along with the additional information reported from the Device. This will be a default setting for any Devices that are currently reporting Battery. Adding this to the Monitoring Center was truly essential as this information is essential for any & all Device monitoring.

Milo Im 9 10-27-14

Update: Add Notes to Unit in Monitoring Center
Benefit to Users:

This Update to the Item, within the Monitoring Center, will enable the User to quickly add Notes. These Notes are associated with the individual Items – or the Group in which the Item belongs to – in the Monitoring Center. Prior to this Release, the ability to add Notes to Items was only available on the full Platform and not within the Monitoring Center.

Highlight:

Users can now add Notes to the Items within the Track Page of the Monitoring Center. The Note can be added to either the Individual Item or to the entire Group in which the Item belongs. This will enable not just the current User to view the Note but, also any other Users with access to the Item. This is essential for Monitoring Centers with multiple Users, reporting in for multiple shifts.

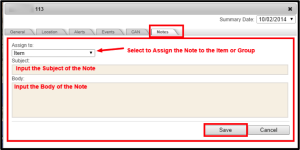
To add a Note, simply follow these steps:

Login to the Monitoring Center Platform
Select the ‘Track’ Page
Select the Information Pop-Up for the Item in which you wish to add the Note for
Select the ‘Notes’ tab from the Pop-Up
Select the ‘Add Note’ option
Select the ‘Assign to’ and input the Subject & Body of the Note
Select the ‘Save’ Button

Milo Im 10  10-27-14

Milo Fleet Management System Release Notes – September 2014

Milo Fleet Management System Release Notes — Release Date: September 2014
Enhancement: Supporting Temperature 3 & 4

Benefit to Users:

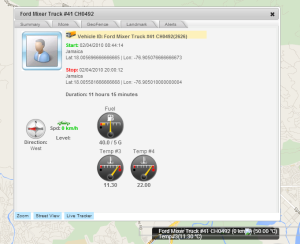
This Enhancement is to Support Temperature Values 3 & 4 sent from your Device. The Device would need to be integrated to take advantage of this Enhancement. Prior to this Release, you were only able to see up to 2 Temperature Values. By providing this Enhancement, Users are now able to closely monitor multiple Temperatures in Various Locations of the Platform.

Highlight:

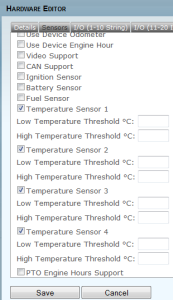
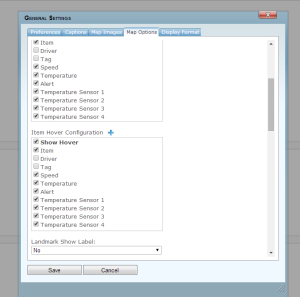
Users will now be able to visualize the Temperature Values 3 & 4 with Gauges on the Informational Pop-Up, In the Item Label Configuration and Item Hover Configuration. Simply follow these steps to visualize the information throughout the Platform:

Login as Site Admin
Select the Sensors tab
Select the Number of Temperature Sensors in use
Provide a Low and High Value (optional)
Login to a Client
Select Tools and Settings
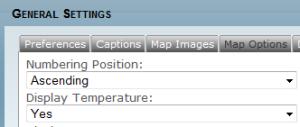
Select Manage General Settings
Select the Map Options Tab
Select Yes to Display Temperature
Choose if you would like to see it in the Item Label and/or Item Hover

Milo Image 1 10-27-14

Milo Im 2 20-27-14

Milo Im 3 10-27-14

Milo Im 4 10-27-14

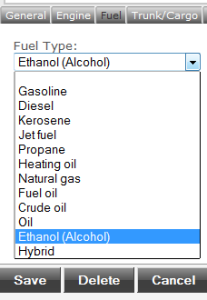
Enhancement: Ethanol added to Fuel Type Options
Benefit to Users:

While this field is for informational purposes only, the goal is to have everything documented & located in one place. Providing the option to configure a variety of fuel options, enables the user to make additions as the fuel consumption/monitoring technology becomes available.

Milo Im 5 10-27-14

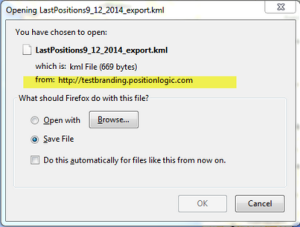
Bug Fix: Export KML Feature was Displaying Site Domain instead of Sub Domain Clients
Issue:

When a Sub-Client under their own account exported data to KML, we displayed the main domain instead of the sub-domain. This did not allow our client to fully white label their Platform. This issue was only occurring for a limited amount of Users however, this is now working as expected for everyone.

Solution:

Sub-Clients are now able to export KML without having their Service Providers main domain display for the End Users. This has been corrected for all Platforms to ensure that all users, will receive the comfort of a complete white label solution.

Milo Im 6 10-27-14

Recover A Stolen Vehicle with GPS Tracking

Stolen Vehicle

I was speaking to a customer the other day about their GPS tracking system and he told me an interesting story. He said that he had a stolen vehicle recovered because of his GPS tracking system. As a matter of fact he had two stolen vehicles recovered and almost one more. The third one had been stolen from a mechanics shop. It was not discovered for more than a week. The last location showed the vehicle or GPS unit (it had a backup battery) at what appeared to be a chop shop on a seedy side of town.

Recover Stolen Vehicle

Milo Fleet Management System

When the customer discovered the vehicle had been stolen he immediately logged into the Milo Fleet Management System. He was able to quickly locate the vehicle. He immediately called the San Antonio Police Department. Police were soon following the vehicle and it was recovered without incident.

Remain Efficient

By recovering the vehicle so quickly the customer saved potential damage to the vehicle and prevented a possible increase in insurance premiums. Not to mention any possible injuries that could have occurred in an accident.

The quick recovery allowed the customer to remain productive. He was not spending his time dealing with insurance, securing a new vehicle, or upset customers. The business kept going and his customers were not affected.

In conclusion, the Milo Fleet Management System allowed our customer to quickly recover two stolen vehicles. The GPS system saved our customer both time and money. I think this story is a great example of the power of GPS tracking.

Thank-you for visiting our blog!

Michael Goldberg
President, Efficient Fleets

Efficient Fleets is a logistics company that uses GPS tracking and mapping to make your fleet safer, more efficient, and less expensive. For more information please contact us.

GPS Tracking Can Help Stop Unauthorized Vehicle Use

Do you know how much unauthorized use you have?

If a company owns a fleet of vehicles there is a good chance that some drivers are using the vehicle for personal use. This could include running errands, going home during work, or worst of all doing side jobs. Most managers are aware of this, but have a hard time managing it.

The unauthorized use is costly in time, money, and liability. If a company loses control it could cost hundreds if not thousands of dollars per year. Personal errands are a waste of company resources and expose the company to additional risk. Side jobs cost the company more money because in addition they are taking revenue that should be going to the company.

GPS Tracking Can Help Stop Unauthorized Vehicle Use

One of the best ways to make sure that your fleet is being used properly is to use a GPS tracking system. A tracking system will tell you every location that your vehicles have visited. You can mark unauthorized locations and receive an alert if a vehicle visits it.

A GPS system provides an accurate record of the vehicle’s activities. A complete log is kept that can be searched at any time. This can help eliminate disputes between the employer and employee.

Most GPS tracking systems are web based and easy to use. You can monitor your fleet from any computer and in most cases from your smart phone or tablet.

GPS Tracking Tools

There are some basic tools in any GPS tracking system that are useful in preventing unauthorized use. They are geofences and landmarks. A geofence is a boundary that is drawn on the map. The GPS system will track when a vehicle enters and exits all the geofences. A geofence can be drawn around any location that you do not want your fleet to visit. An alert can then be sent to your phone or email.

CircularGeofence
A landmark is similar to a geofence, but instead of a boundary it is a marker. A landmark is easier to create, but is less accurate than a geofence.

Landmark

In most cases the unauthorized use will stop almost immediately once the drivers know that GPS tracking has been installed. A quick review of the GPS logs will indicate if any unauthorized stops occurred. The logs can be shared with the driver to help correct the behavior.

Efficient Fleets is a logistics company that uses GPS tracking and mapping to make your fleet safer, more efficient, and less expensive. For more information please contact us.

Automate Mileage Reports

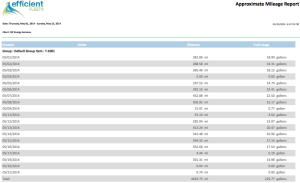
Mileage ReportAutomate Mileage Reports

Trucking companies need to calculate the miles each truck drives in their fleet for a variety of reasons. They need to keep up with routine maintenance, calculate trip cost, pay IFTA fuel taxes, and much more.

Traditionally calculating mileage was a tedious, manual task. It often involved a paper, pencil, and clipboard. The driver would write the odometer at the beginning and end of his trip. Someone in the office would have to enter the data into a spreadsheet and then calculate the miles driven. This could take hours or days depending on the size of the fleet.

The amount of time spent recording and calculating mileage is both inefficient and costly to the company. The time spent could be used in a more productive manner.

GPS Tracking Automatically Calculates Mileage

A GPS tracking system can eliminate the time and money wasted in manually calculating the miles each truck drives. The system automatically calculates the mileage. This eliminates the time spent collecting, storing, and calculating mileage.

GPS tracking makes mileage calculations:

1. Easy
2. More Accurate
3. Less Time Consuming

Easy to Use

The user simply runs a mileage report to see how many miles each truck has driven. There is no need to work with a complicated spreadsheet. The report can be run at anytime to check on mileage.

More Accurate

GPS calculated mileage reports are more accurate than mileage collected and calculated by hand. Paper logs depend on the driver to write down the odometer and for someone else to enter the data into a spreadsheet. The manual data entry can allow errors to creep in. With a GPS tracking system the entire data entry process can be eliminated.

Save Time

Automated GPS mileage saves time. Both drivers and office staff will no longer have to spend time collecting, calculating, and storing odometer values. This can reduce operating expenses and increase efficiency.

GPS tracking provides many benefits to trucking companies. One of the greatest benefits is automated mileage reports. They are easy to use, more accurate, and they save time. If you own or manage a trucking company without using GPS then you are leaving money on the table.

Efficient Fleets is a logistics company that uses GPS tracking and mapping to make your fleet safer, more efficient, and less expensive. For more information please contact us.

Enforce Speed Limits on Drilling Sites

Easily Comply with Speed Limits on Drilling Sites

Speed SignSpeeding on drilling sites is unsafe and expensive. Most of the roads on a drilling site are unpaved and  not safe at high speeds. To ensure safety drilling companies enforce speed limits on their properties. They tend to use security companies to monitor the speed of trucks operating on their sites. The companies often enforce compliance through fines and sometimes removal from the well site. As a contractor you are responsible for your driver’s behavior. Unfortunately, it is difficult to enforce safety rules such as speed limits when you are not in the vehicle. The next best thing is to use a GPS tracking system to remotely monitor the speed of your fleet.

GeofenceCreate A Geofence to Monitor Speed Limits

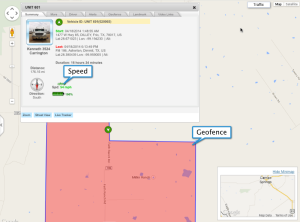
One of the best tools a GPS tracking system provides is the geofence. A geofence is a virtual fence or boundary that can be used to monitor the activity of your fleet on a drilling site or any other location. You can set a speed limit within the geofence to make sure your fleet does not violate that rule. If the rule is broken an alert can be sent directly to a mobile phone or email. The violation is also recorded in a report so it can be retrieved at any time.

The Eagle Ford Shale encompasses a large section of South Texas. It spans 30 counties and is considered the most active shale play in the world. As of April 19, 2014, there are 267 rigs running. With such a large area to cover you need to have the right geofence tools. Make sure the GPS tracking system you are considering has the ability to draw polygon geofences and can import geofences from Google Earth or other sources.

Geofence speedGPS Tracking Makes Compliance Easy

A good GPS tracking system can help make compliance easier and more efficient. There are many rules that have to be enforced and speeding is one of them. One of the most basic functions of a reliable GPS system is monitoring the speed of a vehicle. The system should report the speed and location of the vehicle. You should also have the ability to set a speed alert so you can monitor unsafe driving.

Efficient Fleets is a logistics company that uses GPS tracking and mapping to make your fleet safer, more efficient, and less expensive. For more information please contact us.

Assign Driver to Vehicle

Assign Driver to Vehicle

In this lesson we are going to assign the driver you created in the previous lesson. Assigning a driver to a vehicle allows you to determine which person was responsible for a particular action. This is very useful when more than one driver operates a vehicle.

1. Click Vehicle.
2. Click the pencil next to the vehicle you created earlier.
3. Click the Driver tab.
4. Click Assign Driver.
5. Click Search.
6. A list of all drivers will be returned.
7. Click on the one you created previous lesson.
8. Click Assign.
9. Click Save.
10. Click on Group Name at the top of the screen.
11. Click on Vehicle
12. Verify that the driver has been assigned to the vehicle.

Tip: When searching for a driver, you can type part of the name to get a list of drivers. This is very handy when you don’t know how to spell someone’s name.